3D printing OSM data
This page is about generating plastic prints of small city models, using just OSM data. Here we are leaving the GIS world and enter the 3D modelling and CAM arena to get some real hardware.
Preparations
- Find a 3D printer owner (hackerspace, printer scene, local university or commercial (shops in the OSM data)). If you get one, ask him for specs for the resulting 3D model (resolution, sustainer, ...)
- Enrich desired area with 3D tagging and micromapping in general
- Download OSM2World (SVN recommend!) and practise using small OSM areas. Therefore, loading small parts (less than a district recommend) using JOSM and reopen the .OSM file with O2W
- Install Blender3D and learn basic editing
- Install Meshlab3D and try to open some .OBJ files from the web
Export
| Don't upload your changes or you will erase data in the OSM DB! |
- Use JOSM editor to download a certain area.
- Store this dump as .OSM file
- Cleanup the area:
- Cut/splitup roads and areas that only hit or leave your desired area.
- Remove delicated objects (usually city furnitures/nature/... as current models aren't printer friendly)
- Remove overhanging buildingparts (if the printer doesn't support assisting frames to stabilize it)
- Maybe more depending on use of the 3D model (e.g. if a mask for chocolate needs only buildings)
- Save file
- Open it with OSM2World again and wait for processing finished
- Check if your area looks as desired and if it will fit.
- Export to single .OBJ file
Post Editing
- Fire up Blender3D and import the .OBJ file.
- Check from various perspectives, if the geometries are still looking ok.
- Move all highway areas to layer 2. Selection can be done manually or with the scene outliner.
- Extrude only the highway outline polygone, to get an negative extrusion effect for the roads.
- Add an carrier board, that touches the buildings and the highway outline. Last one needs to have the right z-position to let the roads be small enough, but still printable.
- Check again if the whole model seems to be printable
- Make an .OBJ export again, this time from Blender and to get an final mesh
| Don't use Blenders internal .STL export, as it seem to be broken! |
CAM Postprocessing
To get a list of commands for your printer, you will have to import the .STL file in a specific Computer Aided Modelling-suite. That heavily depends on the toolchain your printer uses. It might be necessary to do further fixes, as fixing overlapping parts etc.
Printing
![]()
- Load final .OBJ from Blender into Meshlab
- Export it as .STL file
Now you got an file, that just contains the outline geometry of your city area. This can be send to your manufacturer. Maybe the results aren't perfect in the first run, so you might tweak one of the previously steps.
Case study Rostock
For Geoforum MV 2013 we micromapped a suburb of Rostock and created an 3D print from an certain area (university campus within the Südstadt district). Thus we used the processes, described above and try to print it with an RepRap Mendel. Sadly the printer was out of order this days :(
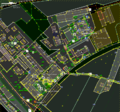
JOSM raw data
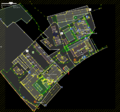
JOSM cleanup
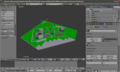
Blender3D final postprocessing


- final dimensions
- time taken
- approx. material costs