WikiProject Uganda/Import Uganda Bureau Of Statistics Education Facilities Workflow
In this wiki we will:
- present the general import rules in OSM, then the data itself, the tool set to make the import, and the extra data that will be added as a useful complement.
- describe step-by-step a workflow to make the import, with screenshots and tips.
Quick Reference
In case you have read and understood this workflow, you can refresh all steps here.
0. Check you have installed the Todo list and UtilsPlugin2 JOSM plugins, and that you have the remote control enabled.
1. Load the data. Choose a task of the project and load the OSM data and the UBOS educational facilities. Load also the Bing and Mapbox aerial imageries.
2. Merge the layers. Merge the UBOS_Educational_Facilities.osm layer with the Data Layer 1 layer.
3. Add UBOS nodes to the Todo list. With the new filter, select all UBOS nodes and add them to the Todo list. Unselect all nodes, unselect the new filter and double-click on the first node of the Todo list. Zoom out to have a better view of the educational facility surroundings.
4. Check the location of the node. If needed, move the node to the correct location. If unsure or no high resolution imagery, add a fixme=Please, check the position of the node tag to the node and report this with a remark in the TM task comment box.
5. Check the spelling of the node (name=*), and correct it when needed. Correct also the spelling of other tags if needed, like names ended in a dot ('.') or mispelled roman numbers, like Ii, Iii, etc.
6. Delete the note:code=* tag after using its info. In case note:code=Please, check if amenity school is ok, check that from other info. If from the name you have that the facility is a nursery or infant school, change amenity=school for amenity=kindergarten.
Check also the info in the note:remarks=* tag, add any tag/s you may derive from that info, and then delete that note:remarks=* tag. Most of the note:remarks=* tags give info about the operator:type=* of the facility (refer to this wiki for specific info on that tag).
7. Merge the UBOS node with an OSM school when needed. Use CTRL+SHIFT+G, and keep all OSM node tags, unless wrong.
8. Mark the node in the Todo list. If there are more nodes still to check, go to step #4. Else, proceed to next step (#9).
9. Check all note:code=* and note:remarks=* tags are deleted. Use the "note:code" OR "note:remarks" filter for this.
10. Upload (import) the nodes to OSM, using your special OSM account, with the following changeset tags:
- comment=Uganda Bureau of Statistics Educational Facilities import, #hotosm-project-1434 (you can (and should) add more informative text if needed)
- source=www.ubos.org
- source:date=2010..2014
- import=yes
- url=https://wiki.openstreetmap.org/wiki/WikiProject_Uganda/Import_Uganda_Bureau_Of_Statistics_Education_Facilities
11. If leaving this import project for the time being, don't forget to switch back to your regular OSM account now, to avoid using it for purposes other than importing
Presentation
Import rules in OSM
The data from the Uganda Bureau Of Statistics, considering its high quality, is to be imported into OSM and consequently, needs to follow the guidelines of any to-be-imported dataset.
The dataset has been analyzed, the attributes have been converted into tags, presented and validated to the imports mailing list.
Any import must be done through a specific OSM user account. So the advice is to create a new OSM user account (eg the usual name with _import at the end) from a secondary email address.
Only the Uganda Bureau Of Statistics data, or the resulting nodes when merging with existing OSM nodes, will be uploaded using this account.
The Uganda Bureau Of Statistics data
According to the Uganda Bureau of Statistics: "These data was collected between 2010 and 2014, based on Arc1960 UTM 36S, for the sole purpose of census enumeration, management and administration, and it could include minor naming mistakes, small measurement errors and be out of date for some new service facility developments in health and education. Therefore, it should be used cautiously within its limitations."
The original dataset consists of 24,587 education facilities nodes.
During the import we will put changeset tags that indicate the source. Nonetheless, it is useful to keep the source tag for each object as the changeset information is not forcefully got from any OSM extract tool and the Uganda Bureau Of Statistics could be disappointed not to be mentioned for this data + the metadata can disappear easily once the information is shared and shared, and the source can be a very useful information for people who will work with these data.
An import through the Tasking Manager
Rather than a single, blind import, it has been decided to import the data with a control check of each object. An specific HOT Tasking Manager project has been created for this purpose.
They all share the same grid and a specific feature: they propose to load in JOSM the extract of the data to be imported over the area of each task (square). Consequently, the normal OSM layer is loaded from the Tasking Manager + one layer containing only the Uganda Bureau Of Statistics data for that task.
Workflow
The workflow will show:
- first the common steps to start
- second, we will show how to check and import the Uganda Bureau Of Statistics education facilities, always using your special OSM import account
Load the data
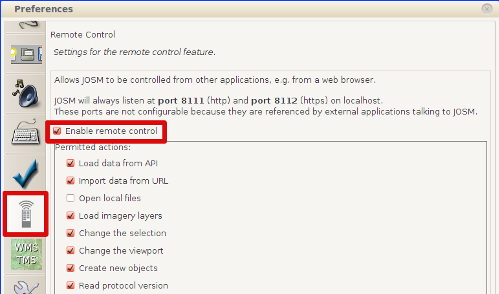
Open JOSM. Before you do anything, check that you have the remote control enabled in the JOSM preferences:
We also have to install the following JOSM plugins (if we don't have them yet in our JOSM): Todo list and UtilsPlugin2.
In case you needed to change any of these preferences, restart JOSM. Load Bing imagery and, if needed, MapBox imagery too (some areas are covered by Mapbox, but not Bing (only low resolution)).
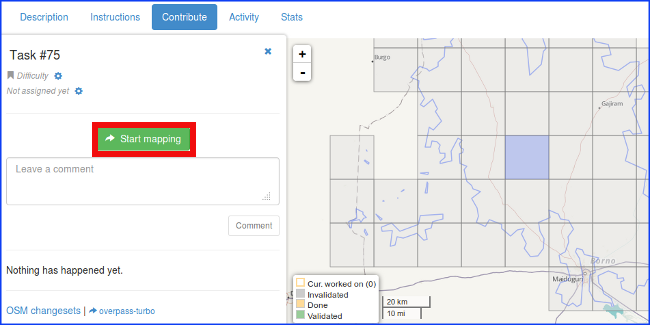
Go to the import TM project, choose a task, click on Start mapping...
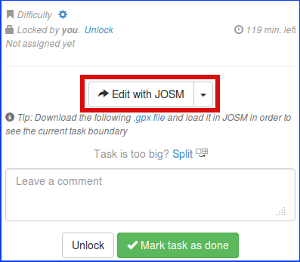
and then click on Edit with JOSM button...
Once the OSM data is loaded, you need to load the UBOS education facilities into a second layer. To do so, click on here in the sentence Download the UBOS educational facilities into JOSM by clicking here in the Extra instructions (Please, be patient! It may take around 20-30 seconds to load):
A new UBOS_Educational_Facilities.osm layer will be loaded in JOSM, containing the educational facilities nodes to be imported for this task:
Finally, load the Bing and the Mapbox imagery.
Importing the educational facilities
Importing the UBOS educational facilities will consist on checking the correctness of the nodes (spelling, presence of duplicates, etc.), adding some data sometimes, merging them with the OSM data (when we find other educational facilities already in OSM) and uploading them with your special OSM account.
WARNING!
This is the actual import step. So we won't touch (create/modify/delete...) any object except importing the educational facilities.
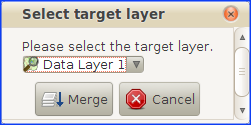
The first thing we will do is to merge the UBOS_Educational_Facilities.osm layer with the OSM data layer (Data Layer 1). So make the UBOS_Educational_Facilities.osm layer active, choose to merge both layers (CTRL+M) and then choose the Data Layer 1 as target layer:
We will have often many educational facilities for our task (40 on average), so we will use the Todo List JOSM plugin to avoid leaving any unchecked educational facility behind.
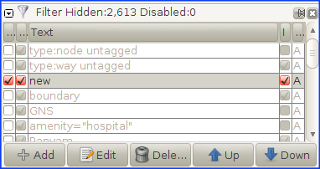
To add them to the Todo List, the best way is filtering the UBOS nodes out. We can do that using the filter new:
To add the nodes to the Todo List, first select all nodes...
... click on the Add button of the Todo List...
... click on any point of the editing area to unselect all those nodes and disable the new filter.
Double-clicking on the first node of the Todo list will automatically zoom in to that educational facility node:
Now zoom out enough, so we can check that the location is correct, and also for the possible presence of other educational facilities around, that we might have to merge the new node with.
Now, we will follow these steps:
1. Check the location of the node. The location of the educational nodes is generally quite correct, but not perfect. Some of the nodes may be as far as 150 m away from the actual position, but spoting a school in Uganda is generally easy.
In this link you can see many examples of nodes that have to be corrected (moved) their location.
For the node of the last screenshot, for example, we can see that it is displaced 125 m to the North from its actual location, so we move it and place it at the centre of the school grounds.
As for the aerial imagery, if you don't have Bing high resolution imagery, try with Mapbox. In case both are low resolution, you can import the facility, but please add a fixme=Please, check the position of the node tag.
If we can't be sure about the exact location of the facility, then we will leave a fixme=Please, check the position of the node. Although unusual, this can happen for a number of reasons: a) For nurseries it's really difficult to be sure, b) Sometimes there is more than one node for more than one school, and they are near to each other, c) presence of clouds in the imagery, or low resolution imagery.
In any case, if we really think the position of the node is not clear, we will add a fixme=Please, check the position of the node as we said, and report that with a remark in the task comments box for later validation.
Finally, if we think the position is suspicious (it's located in the middle of nowhere as the most typical example), we won't import it (just delete it from the JOSM) and we will report that in the comment of the changeset and also in the comments box of the Tasking Manager task.
2. Check the spelling. We will check if the name=* of the educational facility is spelled correctly and respect the cartographic writing conventions.
In the name, we may find abbreviations like "P/School", "N/Sch", "N/P/School", "V/School", "Sec School", etc. In those cases, we will correct them to "Primary School", "Nursery School", "Nursery and Primary School", "Vocational School", "Secondary School", etc.
In case of doubt, we won't make any change to the name and we will leave a fixme=Please check the name correctness tag and a remark on the comments box of the task when we mark it as done in the Tasking Manager.
We will also check the correct spelling for the other tags. In that same example, we have that addr:city=Langi., so we have to correct it to addr:city=Langi. Another common typo is finding names like "Bubaro Ii", "Butega Iii" or "Kirera Iv" in the addr:city=* tag value and other tags. Please, change it to "Bubaro II", "Butega III" and "Kirera IV".
3. Some nodes will come with the node:code=* tag. That tag provides a double checking of the school type of the node.
When node:code=Please, check if amenity school is ok, it means that the code for the facility from the original dataset doesn't provide enough info, or it's absent. In this case you can check that amenity=school is correct or not from other tags, specially from the name=* tag. The most common case where it is incorrect is when we have a facility that is a nursery. In that case, change amenity=school for amenity=kindergarten.
We will delete this tag before we upload the data, as we will explain further down.
4. Another tag that some nodes come with, is the node:remarks=* tag.
This tag provides extra info about the facility. The information it gives are hints about its location, number of buildings of the facility, type of education, levels of education offered, the operator and/or type of operator of the facility, status of the school (abandoned, under construction...), alternative name, week tuition days, what other services it provides, if it has electricity or not, etc. Some of this info can be used to help correcting the location of the facility; some other info can be used to add tags to the node. Examples are:
operator=*, operator:type=*, opening_hours=*, power_supply=*, etc. As there are 1,187 different values for the note:remarks=* tag, we can't document what tag/s we should add based on this info. So we refer you to the OSM wiki in case you don't know what tag you could use, or ask in the mailing lists for help. In case you don't add any tag but you think one or more tags could be added based in that info, please leave a comment in the Tasking Manager task comments box.
But the most common info is about the operator type. Most of the node:remarks=* tags have the following values:
- node:remarks=Govt (or similar). In this case, we will add a operator:type=public
- node:remarks=Govt Aided (or similar). The meaning is the same as the one preceeding, so operator:type=public
- node:remarks=Private (or similar). In this case, we will add a operator:type=private
- node:remarks=Private Aided (or similar). The meaning is the same as the one preceeding, so operator:type=private
- Sometimes you may have to use operator:type=community, operator:type=ngo or operator:type=religious
Please refer to this wiki for info about all possible values of the operator:type=* tag.
The note:remarks=* tag won't be imported, so we will delete it before we upload the data, as we will explain further down.
5. Merging with OSM data. It's quite unusual that we find an educational facility already in OSM. In case we find one facility in OSM that corresponds to the UBOS node, we will merge both facilities into one, with the Replace Geometry tool of the UtilsPlugin2 JOSM plugin (shortcut Ctrl+Shift+G), keeping all info that we had for the former OSM facility, except for any info that we clearly see that it is wrong or less accurate/correct than the UBOS one. In some cases, we could add the UBOS name as alt_name=*.
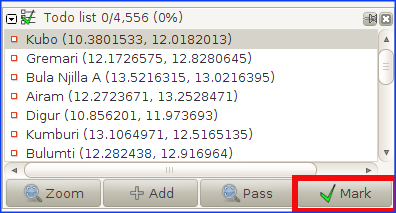
After these 5 steps, this node is ready for import, so you can go to the next educational node by clicking on the Mark button of the Todo list:
After finishing with all nodes, we need to make sure we won't import any of the node:code=* nor node:remarks=* tags from any of the nodes. To do that, we will filter again the nodes, this time with the "node:code" OR "node:remarks" filter...
... select them all, and delete the node:code=* and node:remarks=* tags. Note that we can't use the new filter this time, as it may happen that you have merged some of the UBOS nodes with OSM existing facilities, and those would go unnoticed.
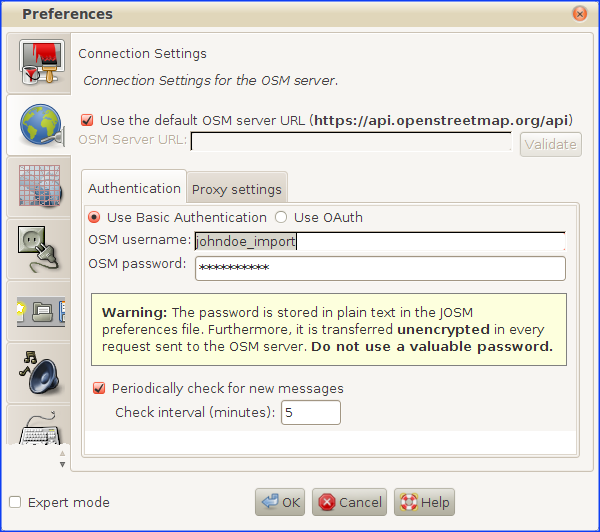
Now you are ready to import the nodes to OSM. As we will import these nodes with the special OSM import account, we need to make sure that we changed the user in the preferences (F12):
Finally, you can click on upload. If you get some warnings/errors correct them and then upload using the following changeset tags:
- comment=Uganda Bureau of Statistics Educational Facilities import, #hotosm-project-1434
- source=www.ubos.org
- source:date=2010..2014
- import=yes
- url=https://wiki.openstreetmap.org/wiki/WikiProject_Uganda/Import_Uganda_Bureau_Of_Statistics_Education_Facilities
To the comment=* tag, you may need to add particular comments to the changeset.
WARNING!
If you see that in the list of objects to upload (see last screenshot) there is anything not related with educational facilities, then that means that you have created/modified/deleted other objects (like roads, buildings, etc). Sorry for that, but in this case the safest is to proceed the following way:
1. Delete the Data Layer 1
2. Go to the Tasking Manager and load again the OSM data and the UBOS educational facilities as before.
3. Go directly to this section of Importing the educational facilities nodes and start again with the merging of both layers, checking of the educational facilities, etc.
Good! Now go to the Tasking Manager, write the remarks about any issues you might have encountered, and mark the task as done.
In case you want to leave it for now and to avoid using the special OSM import account (example: johndoe_import) for other non-import edits, go now to the JOSM Preferences (F12) and switch back to your regular OSM account (example: johndoe).
If you are happy with what you did, you are now ready to start another task!
