Creating a track with Maemo-mapper
Device Setup
For this tutorial, I will assume that you have paired your Bluetooth GPS and set up a map repository. If not take a look at this post
Using the hardware key setup below is optional, but does allow the software to be used without resorting to the menus.
To Edit the hardware key actions select "Menu -> Settings... -> Hardware Keys..." then use the drop down boxes to select your prefered action.

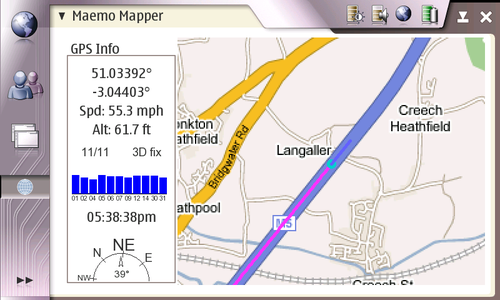
In the "View" menu make sure that the "Tracks" option is checked.
In the "GPS" menu make sure that the "Show information" option is checked and "Enable GPS" is unchecked.
Collecting Data
I will assume for this section that your hardware keys are configured as shown above.
Quick start
- Switch on your GPS
- "Enable GPS" on Maemo mapper using the Return key
 of from the GPS Menu.
 - With "Show Information" in the GPS menu checked, a panel will appear on the left hand side of the screen showing that satellite status. Once your bluetooth GPS has been detected black bars will appear for each satellite detected. Once a lock has been achieved the bars will turn blue. When there are 4 blue bars you will have a 3D fix and the track will start being recorded.
- Go on your journey.
- At the end of the journey press the return key again to disconnect the GPS.
- Switch off your GPS.
- You can now export the track as detailed below.

Data Collection Notes
One Journey per Track
Maemo-Mapper will append each journey to the current track, so try to get in the habit of saving and clearing the track at the end of each journey.
Improving initial accuracy
The current version of Maemo-mapper records the track all the time it has a fix. This means that at the start of a journey the accuracy is at its worst and the track can be 40 meters off. Providing you don't have any previous tracks in memory (see above) you can use "Up" on the Direction Pad (or "Menu -> Track -> Clear") to delete the initial inaccurate track. I tend to start my GPS as soon as I leave home (or work) and then clear the track when I get to the area I want to survey. In this way I've generally got a lock on eight to twelve salellites for the survey.
Recording details as Marks
As well as continuously recording your position, Maemo mapper can also note a few lines of text at your current position. This can be used to record street names, post boxes or any other features you find without the need for a notebook or camera. The text is added to the GPX track of your position as a 'desc' tag which can be configured to be visible with your track in Maemo mapper and in OSM tools like JOSM.

Being able to fully record streets and features into a single file gives a very clean mapping workflow, although it does take a little more effort to type notes when out and about.
When recording a track, select File -> Track -> Insert Mark... and enter your comments in the Description dialogue box. Current versions of Maemo mapper (2.4.1) don't allow this action to be configured with a Hardware Key so access to the menus is needed. A cradle for the N800/ N810 with a stylus on a string makes this easier when mapping.
Exporting the track
To export the track to a gpx file select "Menu -> Tracks -> Save...". When the dialog appears change to your target folder (by default it will try to save in / and fail without showing any error), give the track name and click OK. Maemo-mapper doesn't add a .gpx extension by default, so make sure you include one in the filename. I would advise storing your tracks to the RS-MMC/SD flash card so they can be accessed from a PC.
Track management
Over time you can collect a lot of traces (I have over a hundred) so it is important to have a system so you can find individual files and ensure that files are not uploaded twice.
This is the system I have adopted, but feel free to create your own.
File Location
- The flash card has a directory structure of "/maemo-mapper/tracks/uploaded/"
- New tracks are saved into "/maemo-mapper/tracks/".
- Once uploaded to OSM the track is moved into "/uploaded/"
File Naming
To make the filenames descriptive I use this format: YYYYMMDDHHmm_Device_Route.gpx where
- YYYYMMDDHHmm is the journey end date and time. This ensures files are sorted in date order.
- Device is a short name for the capture device (E.G. Maemo/Etrex/N95).
- Route. A underscore separated list of notable placenames to describe the route.
Maemo-mapper remembers the last file name so you don't need to type the whole string in every time.
For instance a typical file name might be 200708060810_Maemo_NP_M5J24_Ruishton.gpx indicating that:
- The journey was from North Petherton To Ruishton via Junction 24 of the M5.
- The track was recorded using Maemo-mapper
- The file was saved at 08:10am on 6th August 2007
Uploading the track
Tracks can be uploaded to OSM directly from the 770/ N800/ N810.
- Start the browser and point it at http://www.openstreetmap.org/traces/mine
- Enter your username and password when prompted.
- Click browse and navigate to your tracks directory.
- Select the file to upload
- Fill in the description and tag fields
- Uncheck "public" if desired
- Click "upload"
- Repeat for each track you want to upload.

Viewing the track and Marks
Once you have mapped an area and created a GPX file, the route and any text marks recorded can be viewed in Maemo mapper by loading the GPX file back in as a Route. This may be slightly counter-intuitive, as the Routes were originally designed to show where to go (by downloading from a map routing site), rather where you have already been (a track).
Maemo mapper shows both the path taken, and also any Marks created to note street names or features. Clicking on the Mark circle displays the text note.
GPX files can be easily imported into JOSM, however by default the track and Marks are not easy to see. Open your GPX file in JOSM. This creates a new layer for the file. Using the 'Layers' panel (Alt-L'), select the GPX filename, and right-click to show an options menu. Select 'Customise Line Drawing' to 'Draw lines between points for this layer', 'Customise Color' to make the track stand out, then 'Markers from Named Points' to show your Marks clearly on screen.

This customisation makes full electronic mapping from the field to the map very convenient and highly accurate without the need for other devices or paper notes.
See also
- User:Onion/Mapper An fork of Maemo Mapper with better OSM compatibility