Richmond Upon Thames, UK/Petersham Common Woods
A guide for Tagging Petersham Common Woods. The hope is that by editing this procedure it can be an example of good practice for other similar areas. This work was done under the direction of the Petersham Common Conservators.
Current main editors: amunizp and Ken MacKenzie using on the ground knowledge and Garmin GPS camera.
Most of this wiki will involve images of the JOSM editor but hopefully other editors have similar settings. We will also use images from the online editor/viewer.
Click on the images to see larger screen shots.
We recommend always saving you progress on your local machine so even if the connections falls you will always be able to get back to it later.
Local knowledge and manual survey was used by Ken so there is no licence issues.
Trees
- Created a new key called TPO. The label is Yes or no. If not TPO is set it is by default a No.
- For the Petersham Woods we will normally have these descriptors: note that caps are needed
| Key | Value | notes |
|---|---|---|
| natural | tree | |
| ref:tree_tag | 0058 | This is the actual tag value |
| name | ||
| genus | Quercus | Latin name |
| species | robus | the lating species name |
| species:en | English Oak | English name of the speciece |
| note | tag 0058 DBH (cm) 2017-08-31 = 80 | This is the longest descriptor to add a bit of history to the tree.
it contains: tag DBH (cm) YYYY-MM-DD = ## rounded decimals (newest value) DBH (cm) YYYY-MM-DD = ## (older value) |
| circumference | 250 | Key:circumference follow the guidance. should be only the latest value of what is found on the notes. |
| web page | http://www.richmond.gov.uk/home/services/parks_and_open_spaces/find_a_park/park_details.htm?parkId=227 | This web page will do at the minute |
| protected | No | Sycamores might be important. |
| source | survey;local knowledge | Because it is a combination of survey and local knowledge |
| denotation | Some relevent data such as
|
Habitats
| Key | Value | Notes |
|---|---|---|
| boundry | protected_area | |
| protect_class | 7 | UK has a descriptor this is the best we could find |
| related_law | Protection of Animals Act 1911 | This in the case of animals such as badger sett |
Person holes (man holes)
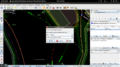
- Open your JOSM as usual and Go to File > Open
- After that the image will show as a small pop up and on the map it will be highlighted as a red camera icon
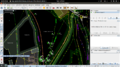
- Zoom in as far as you can to get a small area. Then using the "Draw Nodes" or pressing the letter A the pointer will change to a cross click at the peak of the camera arrow to locate the node
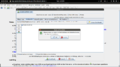
- After that, select the node on the bottom left menu select the node. The +Add botton become active and you can start filling in the key and values as described in Key:manhole
- Save the file to your computer and upload to OSM.
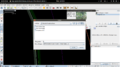
File Open Menu on JOSM
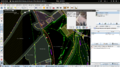
Selected Geotagged image
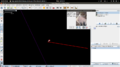
Add a node where the Geo Tagged photo is
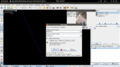
Adding Keys and Labels to your Node


- After that we can see the Since we did not give the manhole a name we will not be able to see them in the default view of the map.
- We click on the Layers Icon on the right and Tick the box that says Map Data
- We can now see the blue circle with the item we have just uploaded, if we click on it we can see the information uploaded.
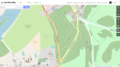
View online of Petersham Common Wood
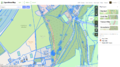
View online of Map data View of Petersham Common Woods
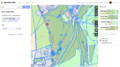
View online Map data after selecting the Node of interest (manhole)


Paths
- We can divide the existing tracks into two different ones by using the "Split"
- We can edit names by clicking on the path.
- Adding a new path is normally done by uploading the GPX data. Or connecting nodes. Or drawing them using the satellite images.
Split way of the path in a certain node.
Rename the way from it's original misnomer.


Boundaries
- These are normally set. Just need tugging to adjust the correct place.
Helpful Settings
Starting up
- After loading JOSM the first thing you will want to do it load a map.
- It is a good idea to use the Bookmark tab to save your map for later: will save you from selecting the area at every start up.

Start page Load from map
Bookmark map to get back to it later.


Using filters
Creating filters are useful to see the wood from the trees. Say you only want to see the man holes or only the trees on the maps. Or only a certain kind of tree.
- Press the filter button on the left (looks like a funnel)
- Filter menu shows on the bottom left Click "+ADD" to show the items.
- Search nodes items or descriptions that you want to highlight. You can use the filter string or search by a pre-set on the right.
- After you filter you can invert by ticking the I column. This will highlight only the manhole.
Bottom left on the list of buttons. Funnel shaped icon is the filter.

After clicking "+ADD" on the filter menu that appears on the bottom left the filter window pops.

Search nodes items or descriptions that you want to highlight.
Filter active highlighting the only the Manhole: small blue dot.


